
Introduction
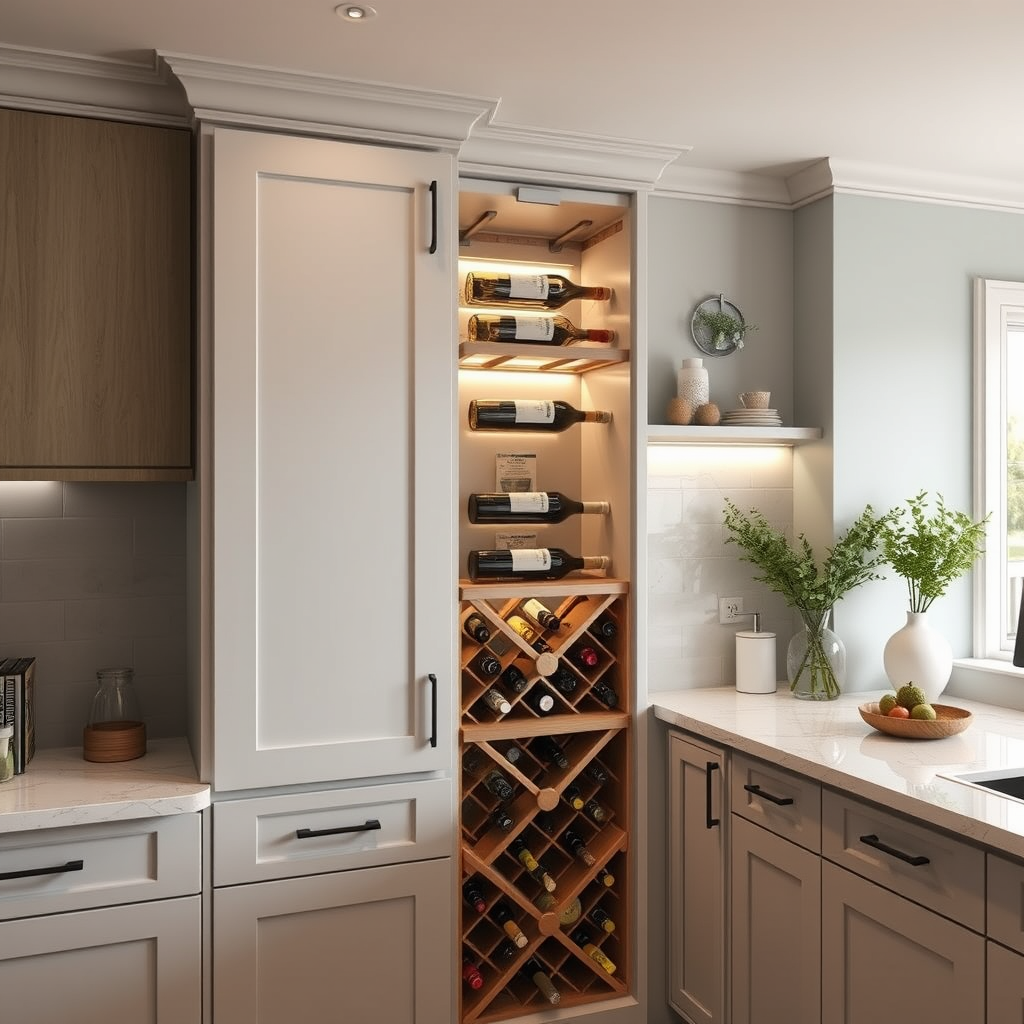
Building a wine rack inside a kitchen cabinet is a creative solution for wine enthusiasts who seek to maximize their kitchen space while keeping their wine collection organized and easily accessible. Whether you have a small apartment or a spacious kitchen, incorporating a wine rack into your cabinetry can enhance the aesthetics of your space and elevate your wine storage options. In this comprehensive guide, we will walk you through the step-by-step process of building a wine rack that not only complements your kitchen design but also provides a functional storage solution for your valuable bottles. From selecting the right materials to ensuring proper ventilation, we’ve got all the essential tips and techniques to help you create a beautiful and practical wine rack in your kitchen cabinet.
Understanding Wine Storage Needs
Before embarking on the project of building a wine rack, it’s crucial to understand the specific storage needs of wine. Proper storage conditions can significantly affect the quality and longevity of wine. Key factors to consider include:
- Temperature: Wine should be stored at a stable temperature, ideally between 50°F to 55°F (10°C to 13°C).
- Humidity: A humidity level of 50% to 70% is ideal to prevent corks from drying out.
- Light: Protecting wine from direct sunlight minimizes degradation of flavors.
- Storage Position: Wine should be stored horizontally so the cork stays moist and does not dry out, allowing air to seep in.
Types of Wine Racks for Cabinets
When planning to build a wine rack in your kitchen cabinet, it’s essential to consider the various types of wine racks available. Here are two popular options to compare:
| Type of Wine Rack | Design | Capacity | Ease of Construction |
|---|---|---|---|
| Built-in Rack | Custom fit to the cabinet, often utilizing shelving systems | Varies based on structure and cabinet size | Moderate to High – Requires precise measurements and cutting |
| Modular Rack | Freestanding or adjustable units that can fit inside cabinets | Pre-defined capacities, typically smaller | Low – Easy assembly, minimal tools needed |
Choosing the Right Location
The first step in building your wine rack is to choose the best spot within your kitchen cabinet. Look for a location that’s cool and dark, away from direct sunlight or heat sources. The ideal height for your wine rack is at eye level for easy access. Consider existing cabinetry space and ensure that the location enhances both accessibility and aesthetics. If you are replacing shelves, determine the height and depth of the new rack to make full use of the cabinet’s interior. Taking measurements accurately will play a pivotal role in ensuring your wine rack fits snugly within the cabinetry without wasted space.
Gathering Materials
Once you’ve selected the location for your wine rack, it’s time to gather the necessary materials. The materials you choose will depend on your design and budget. Common materials for building a wine rack include:
- Wood: Common types include pine, oak, or maple for a classic look.
- Screws and Nails: Essential for assembly.
- Wood Glue: Adds additional strength to assembled pieces.
- Finish or Stain: To enhance the appearance of the wood.
- Tools: A saw, drill, measuring tape, sander, and a level will be important for construction.
Take the time to choose high-quality materials that can withstand the weight of the wine bottles and provide durability over time. A well-constructed wine rack will not only serve as a storage solution but also as a focal point in your kitchen.
Designing Your Wine Rack
The design of your wine rack should not only reflect your personal style but also accommodate the number of bottles you wish to store. Consider various designs such as:
- Stacked Racks: Efficient use of vertical space; perfect for limited cabinets.
- Individual Slots: Each bottle has its own place, ideal for better organization.
- Cradle Racks: Bottles are nestled in cradles, showcasing labels for easy selections.
Think about how many bottles you wish to store and whether you want to incorporate additional features, such as glass holders or shelving for wine accessories. Sketch out your design and consider dimensions, ensuring that everything fits well within your chosen cabinet space.
Measuring and Cutting Your Materials
Once your design is finalized, measuring and cutting the materials comes next. Accurately measure each component of the rack based on your design specifications. Use a measuring tape to double-check dimensions, and mark your cuts using a pencil. Precision at this stage is essential, as miscalculated dimensions can lead to an improper fit.
When cutting your materials, use appropriate tools such as a miter saw or a hand saw, depending on your comfort level and available tools. Pay close attention to safety protocols by wearing protective eyewear and following the manufacturer’s instructions for all tools. Allow for the thickness of wood when measuring slots or areas where bottles will be stored. Check build wine rack in kitchen cabinet prices on Amazon
Assembling the Wine Rack
Now it’s time to assemble your wine rack! Start by constructing the main frame of your rack, securing each piece with screws and wood glue as indicated by your design. Ensure that each joint is flush and secure, as this will directly affect the stability of your wine rack when filled with bottles. Use clamps to hold pieces in place while the glue dries, and make adjustments as necessary to maintain a level surface.
Consider utilizing a level during assembly to ensure that your rack is balanced and straight. The structure should be both visually appealing and stable enough to hold the weight of full wine bottles. If you’re designing a multi-tiered rack, assemble the individual tiers before combining them—this will help streamline the overall assembly process.
Finishing Touches
Once the assembly is complete, it’s time to add the finishing touches to your wine rack. Sand down rough edges to create a smooth, polished finish. This not only enhances the look of your rack but also prevents any splinters or scratches.
After you’ve sanded the surfaces, consider applying a stain or paint to match your kitchen cabinetry. A clear polyurethane can be used to protect the wood and ensure its longevity, especially against any potential spills or humidity from wine bottles. Allow your finish to dry completely before placing bottles into the rack.
Installing the Wine Rack in Your Cabinet
The final step is installing your wine rack inside your kitchen cabinet. Carefully lift the assembled rack and position it within the selected cabinet. Use a level to ensure that the rack is straight, making adjustments as necessary. Securing the rack to the cabinet can provide extra stability and peace of mind, especially if the cabinet will be opened frequently.
If your cabinet is deep or has a particularly high capacity, consider adding brackets or screws to anchor the rack to the cabinetry. This ensures that heavy wine bottles do not cause the rack to shift or lean over time. Reinforce the connection between the wine rack and the cabinet walls or shelves as needed to achieve optimal stability.
Maintaining Your Wine Rack
After installation, it’s important to keep your wine rack in excellent condition to prolong its usefulness and appearance. Here are some maintenance tips:
- Regular Cleaning: Wipe down your rack using a damp cloth to remove dust or spills. Avoid harsh chemicals that can damage the finish.
- Check for Stability: Occasionally check the stability of the wine rack by ensuring that it remains straight and secure in its space.
- Monitor Temperature and Humidity: Use a thermometer and hygrometer to ensure that conditions remain optimal for wine storage.
- Inspect for Damage: Regularly inspect for any signs of wear or damage. Early detection allows for quick repairs and maintenance.
Establishing a routine for upkeep will not only help maintain aesthetics but also preserve the quality of your wine collection over time.
Frequently Asked Questions
Can I build a wine rack without prior woodworking experience?
Yes, even those without prior woodworking experience can build a simple wine rack. Ensure you prepare by gathering proper materials and tools, and follow detailed instructions.
What type of wood is best for a wine rack?
Common choices for wine racks include hardwoods like oak, cherry, or maple for durability and aesthetics. Consider wood types based on your kitchen style and budget.
How many bottles will fit in a standard kitchen cabinet wine rack?
This depends on the design and size of your cabinet. A well-planned wine rack can typically accommodate anywhere from 8 to 36 bottles.
Do I need special tools to build a wine rack?
Basic hand tools such as a saw, drill, and screwdriver should suffice for a simple wine rack. A level and measuring tape are also essential for accuracy.
Can I store different types of wine together?
Yes, different types of wine can be stored together as long as they are kept at the right temperature and humidity levels. Make sure your rack accommodates both bottle sizes.
How often should I check my wine storage conditions?
It’s advisable to check your wine storage conditions at least once every month to ensure the temperature and humidity are maintained within the appropriate range.
Are modular wine racks a good option for beginners?
Yes, modular wine racks are beginner-friendly, as they usually require minimal assembly and can easily fit into existing cabinetry without major alterations.
How do I ensure my wine bottles remain safe in the rack?
A well-built and securely installed wine rack will keep bottles safe. Ensure the rack is stable, and periodically check for any signs of wear that could affect security.
Final Thoughts
Building a wine rack inside a kitchen cabinet is an exciting DIY project that not only enhances your home’s functionality but also adds a personal touch to your space. With careful planning, precise measurements, and attention to detail, you can create a wine storage solution that meets your specific needs and complements your kitchen’s aesthetic. From understanding the importance of ideal storage conditions to properly maintaining your finished rack, each step ensures your wine collection remains protected and easily accessible. Embrace the joy of wine collecting by creating a customized wine rack that perfectly fits within your home.
